RPC:ICE
网络通信引擎(Internet Communications Engine, Ice)是由 ZeroC 的分布式系统开发专家实现的一种高性能、面向对象的中间件平台。它提供了以下这些特性:跨平台、跨语言、分布式、安全、服务透明及负载均衡。在项目中,我们把它当作一个跨语言的 Rpc 框架来使用,实现 C++ 与 Java 两种语言的互调用,它隐藏了底层的通信细节,上层只需要关注业务即可。本文主要介绍 Ice 使用的方式,如直连模式、Registry 注册模式及 Registry Node 模式。
概述
整体架构
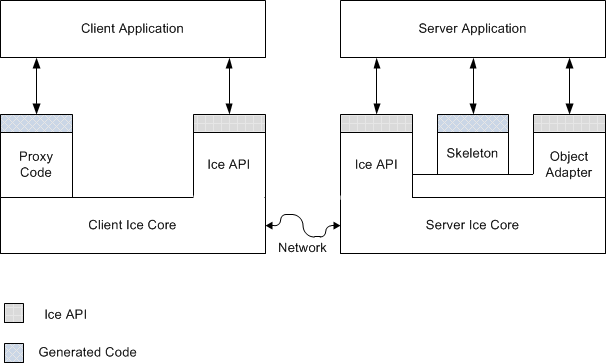
Ice 客户端与服务器整体结构如下所示: 
关键概念: 客户端和服务器 客户端是主动的实体,向服务器端发出服务请求;服务器端是被动的实体,他们提供服务,响应客户端的请求。这两个角色并不是应用系统的组成部分的严格指称,而是表示在某个请求从发生到结束期间,应用系统某些部分所承担的角色。通常这样的角色界定是不固定的,甚至会经常性的发生反转行为。所以,许多客户/服务器常可以被准确的描述为对等系统(peer-to-peer),客户端和服务器角色只有在执行某个特定操作、在特定的时间能才有绝对意义
Ice 核心 Ice 核心包含大量的链接库,是处于核心地位的对象总线,为客户端和服务器的远程通信提供支持。它主要关心的是网络通信、线程、字节序、其它一些网络细节及相关事务等,并将应用程序与这些底层事务隔离开。
Ice API Ice 应用程序接口(API),提供对 Ice 核心的通用部分(与 Slice 中定义的特定类型无关的部分)的访问,程序开发人员可以使用 Ice API 做一些 Ice 的管理事务,例如 Ice 运行时的初始化和结束。客户端和服务器所使用的 Ice API 是一样的,在服务器使用的可能会多一些。
对象适配器 对象适配器是专用于服务器端的 Ice API 的一部分:只有服务器才使用对象适配器。对象服务器有若干功能,如下所示:
- 对象适配器把来自客户端的请求映射到服务器端特定对象的特定方法上;
- 对象适配器会跟踪在内存中的伺服对象,记录其对象标识,从而实现适配请求的功能;
- 对象适配器可以与一个或多个传输端点关联在一起。如果与某个适配器关联的传输端点不止一个,就可以通过多种传输机制到达在该适配器中的伺服对象。为了提供不同的服务质量和性能,一个适配器可以同时关联一个 TCP/IP|端点和一个 UDP 端点;
- 对象适配器负责创建传给客户端的 Ice 代理。对象适配器知道每个对象的类型、标识以及传输机制的详细信息。当服务器端应用程序要求创建代理时,对象适配器会在其中嵌入正确的信息。
Ice 代理 代理代码是由用户定义的 Slice 文件经过编译后生成的。一个客户端要想与一个 Ice 对象建立联系,必须持有该 Ice 对象的代理。代理是存在于客户端地址空间的 Ice 对象的代表。代理主要有两个功能:
- 为客户提供了一个向下(down-call)调用的接口。如果客户端调用代理中的某个操作,就会有一个 RPC 消息被发送到服务器,从而调用目标对象上的某个对应的操作。以代理为中介,客户端发起的调用最终会调用到服务器目标对象上相应的操作;
- 提供编码(marshaling)和解码(unmarshaling)。编码是将复杂的数据结构串行化,使其便于网络传输的过程。编码把数据转化为适合于传送的标准形式,这种形式不依赖于本地机器的字节序和填充规则。解码是编码的逆过程,将通过网络得到的串化数据重新构造成具有类型的结构化数据。解码之后得到的是与所使用的编程语言相适应的类型表示的数据。
Ice 骨架(skeleton) 骨架代码也是由用户定义的 Slice 文件经过编译后生成的,其中的内容与 Slice 中定义的对象和数据的类型是对应的。骨架代码是客户端的代理代码在服务器端的等价物。它提供了向上调用(up-call)的接口,允许 Ice 把控制线程转交给服务器端的应用程序代码。骨架也负责编码和解码,所以服务器可以接收客户端发送的参数,并把返回值和异常传回客户。
Slice 文件
在典型的客户/服务器模式的应用中,开发者使用自己的描述语言或一种公认的标准来定义设备之间需要使用的协议。协议的定义依赖于具体实现时所用的语言、网络传输的情况和许多其它的因素。在 Ice 中,协议是通过使用Slice 语言描述相关应用程序接口来定义的,这是一种十分简单且和编程语言无关的描述语言。 Slice 是一种定义客户和服务器之间规范的基础性机制。每个 Ice 对象都有一个接口,该接口具有某些操作。接口、操作、客户与服务器间交换的数据类型,都是用 Slice 语言定义的。Slice 允许开发人员以一种独立于特定编程语言(比如 c++或 java)的方式定义客户端和服务器端的合约。Slice 定义有特定编译器编译成特定语言的 API,也就是说,与你所定义的接口和数据类型相对应的那部分 API,会有生成的代码组成。
介绍了 Ice 的基本概念,我们使用官方的例子来验证客户端与服务器之间的通信模式:
- 直连模式:客户端与服务器直连,客户端需要明确服务器的地址及端口;
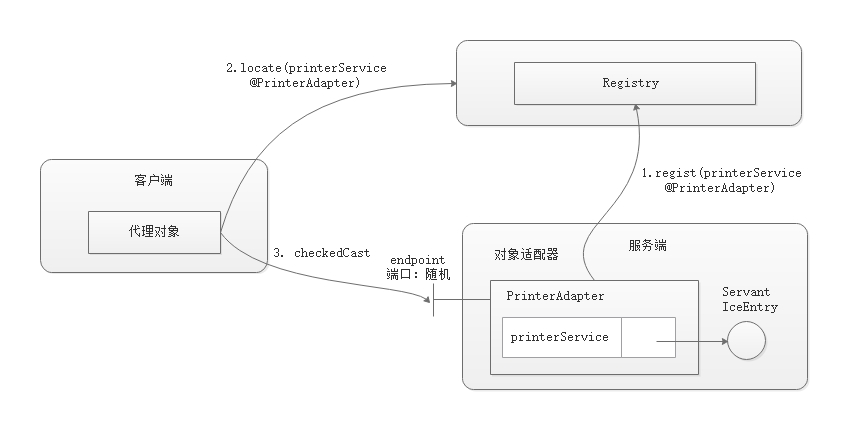
- Registry 注册模式:服务器将 Adpater 注册到 Registry,客户端通过 Registry 来获取服务器信息;
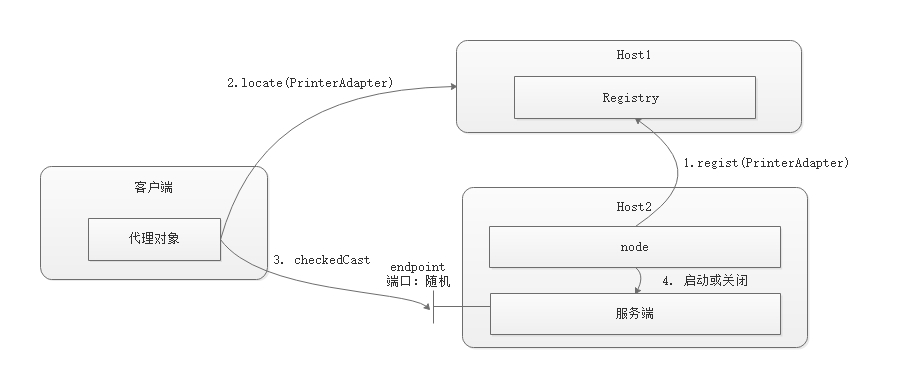
- Registry Node 模式:在 Registry 注册模式基础上,引入一个 Node, 来管理服务生命周期,如服务器的启动关闭,监视服务的状态,若服务关闭,则自动启动起来。
前置条件:
- Ice 版本:Ice 3.5.1
- 操作系统:Win 10 专业版
- 假设:Ice 已经安装,具体版本可以在 ZeroC 官网下载。
编写代码
编写 Slice 文件
使用 Slice 编写一个接口,该接口比较简单,接收一个输入参数,然后打印输出,如下所示:
1 | module org |
接下来使用 slice2java
命令生成客户端及服务器代码,两者都是一份代码,如果要生成其它语言的代码,找到相应的命令即可
slice2XXXX。在这里我们使用的命令如下:
1 | slice2java Printer.ice --output-dir ../src/main/java |
可以根据需要,使用 --output-dir 指定输出的目录。
编写服务端代码
IceEntry 类继承自 _PrinterDisp, 而 _PrinterDisp 是框架自动生成的类,我们只要继承它编写业务代码即可。
1 |
|
定义应用,生成 Adapter 对象,并激活该对象,在这里,adpater 设置为
PrinterAdapter, endpoint 设置为 tcp,
没有指定端口,系统使用随机端口。
1 |
|
启动代码,加入必要的参数。这里,有两个比较重要的参数:PrinterAdapter.AdapterId
及 PrinterAdapter.Endpoints, 要注意的是
XXX.AdapterId 参数中 XXX 要替换为自己的 adpater,
在这里使用的是PrinterAdapter.
1 |
|
编写客户端代码
客户端的调用逻辑如下,它会查询服务的信息。
1 |
|
调用客户端的代码。
1 |
|
直连模式
在直连模式下,服务端需要明确指定端口,同时客户端根据指定的端口直接连接。

服务端代码
指定服务器的端口为 30000.
1 | // PrinterServer 类 |
客户端代码
在代码中指定连接的端口
1 | // PrinterClient 类 |
Registry 注册模式
在直连模式下,需要明确知道服务端的代码,显然在分布式环境这种模式是不合适的。这就引入了
Registry 中心。服务端可以将地址注册到 Registry 中,客户端再去 Registry
查询服务,这样可以动态获取服务器地址。 
服务端代码
正常情况下,服务端可以不用指定端口,在部署情况比较复杂的情况下,需要开通网络策略的时候,也可以指定端口。
1 | // PrinterServer 类 |
同时需要三个参数,如下所示:
1 | InitializationData localInitializationData = new InitializationData(); |
参数说明:
- PrinterAdapter.AdapterId: 指定 Adapter
对象的唯一标识符,以便供客户端定位,如
printerService@PrinterAdapter, 接口对象标识符@Adapter对象标识符; - PrinterAdapter.Endpoints: 指定 Adapter 对象的 endpoint, 在这里没有指定端口,它使用系统分配的随机端口;
- Ice.Default.Locator: 注册中心地址,用于注册 Adpater 对象。
客户端代码
在客户端中指定查询的格式:printerService@PrinterAdapter.
1 | // 注册中心非 Node 模式 service@Adapter |
加入配置参数: 1
2
3
4
5
6String endpoint = "IceGrid/Locator:tcp -h 127.0.0.1 -p 4061";
InitializationData localInitializationData = new InitializationData();
localInitializationData.properties = Util.createProperties();
localInitializationData.properties.setProperty("Ice.Default.Locator", endpoint);
参数说明:
- Ice.Default.Locator: 注册中心地址,用于查询 Adapter 信息。
Registry 配置
1 | IceGrid.InstanceName=IceGrid |
参数说明:
- IceGrid.InstanceName: icegrid 实例的名称,在后续配置中可以使用,如 IceGrid.Registry.PermissionsVerifier;
- IceGrid.Registry.Client.Endpoints: 重要,
指明 Registry 的地址和端口,该地址用来配置该参数
Ice.Default.Locator; - IceGrid.Registry.Server.Endpoints: 用于服务端对象适配器的注册 endpoint, 一般情况下不用指定端口,不过为了线上环境的安全,配置防火墙策略,可以设置端口;
- IceGrid.Registry.Internal.Endpoints: 用于和 IceGrid node, Registry replica 之间通信的 endpoint 。即使没有配置 node 或 Registry replica,这个参数也必须定义;
- IceGrid.Registry.AdminPermissionsVerifier,
IceGrid.Registry.PermissionsVerifier: 这两个属性控制访问 Registry
的管理权限,
NullPermissionsVerifier表示不用安全校验; - IceGrid.Registry.Data: 重要, 这个属性指定Registry的数据库目录,用于存放注册器的一些状态信息,可以任意指定;
- IceGrid.Registry.DynamicRegistration: 重要, 该参数是实现该模式的关键,通过将此属性设置为一个非零值,允许服务器直接注册对象适配器,而不是通过 IceGrid Node;
- IceGrid.Registry.ReplicaName: 指明 Registry 的身份,默认为 Master, 表明为 master Registry, 如果是 Registry replica 必须指定名称,如 Replica1/2/3;
- IceGridAdmin.Username, IceGridAdmin.Password: 指明登陆 Registry 的用户名/密码。
启动 Registry 中心
1 | icegridregistry --Ice.Config=registry.cfg |
登陆 Registy, 使用下面的命令: 1
icegridadmin --Ice.Config=config.cfg
config.cfg 内容如下: 1
2
3
4Ice.Default.Locator=IceGrid/Locator:tcp -h 127.0.0.1 -p 4061
IceGridAdmin.Username=foo
IceGridAdmin.Password=bar
依次启动 Registry, 服务端及客户端,即完成配置。
Registry Node 模式
在 Registry 注册模式基础上,引入一个 Node,
来管理服务生命周期,如服务器的启动关闭,监视服务的状态,若服务关闭,则自动启动起来。

服务端代码
与 Registry 模式相同,正常情况下,不用明确指定端口。
1 | String endpoints = "tcp"; |
加入参数: 1
2
3
4InitializationData localInitializationData = new InitializationData();
localInitializationData.properties = Util.createProperties();
localInitializationData.properties.setProperty("PrinterAdapter.AdapterId", "PrinterAdapter");
localInitializationData.properties.setProperty("PrinterAdapter.Endpoints", "tcp");
注意:不能指定参数
Ice.Default.Locator, 在这种模式下,Adpater 是通过 Node
注册的,无须知道 Registry 的 Endpoint.
客户端代码
直接指明 SimplePrinter 即可。 1
Ice.ObjectPrx base = communicator().stringToProxy("SimplePrinter");
加入配置参数: 1
2
3
4
5
6String endpoint = "IceGrid/Locator:tcp -h 127.0.0.1 -p 4061";
InitializationData localInitializationData = new InitializationData();
localInitializationData.properties = Util.createProperties();
localInitializationData.properties.setProperty("Ice.Default.Locator", endpoint);
参数说明:
- Ice.Default.Locator: 注册中心地址,用于查询 Adapter 信息。
Registry 配置
与 “Registry 注册模式” 配置一致。
Node 配置
1 | Ice.Default.Locator=IceGrid/Locator:tcp -h 127.0.01 -p 4061 |
参数说明:
- Ice.Default.Locator: 配置 Registry endpoint ;
- IceGrid.Node.Name: 重要, node 的名称,必须唯一,在后续应用的部署配置中会用到;
- IceGrid.Node.Endpoints: 配置 node 的 endpoint, 不需要指定固定的端口;
- IceGrid.Node.Output: 配置该 node 的应用日志输出目录;
- IceGrid.Node.Data: 重要, 指定该 node 的数据目录,用于存储该节点的状态信息,可以任意指定;
- IceGrid.Node.CollocateRegistry: 重要, 该参数表明该 node 是否与 registry 一个进程部署,0 为 分开部署,非 0 为一起部署;
启动 Node 的命令: 1
icegridnode --Ice.Config=node1.cfg
部署应用
配置部署文件
1 | <icegrid> |
配置说明:
- application: 应用标签,name 属性定义名字;
- server-template:server 模板,定义了启动程序、apdater 及相关的配置参数,可以复用;
- server: 逻辑上的服务器,是指能够通过 exe
命令的启动的一个服务程序。exe 就是启动这个服务的命令,这个命令不能是 exe
或者 .sh 执行文件。activation 属性,是设置服务的启动方式,on-demand
是按需启动option 标签是 exe 执行命令命令行的参数。这样的配置就相当与使用
java -jar E:\bell-lab\ice\deploy-1\app\ice-lab.jar启动,ice-lab.jar是打包成可执行的服务端 jar 包; - node: 节点标签,代表了一个物理上的节点,节点必须有唯一的名字;
- adapter: 适配器的定义,名字必须唯一,用于服务的注册及查询;
- replica-group:复制分组,代表一组远程可以访问的对象。
将应用部署到 Node 中
启动 Registry, Node, 然后启动 icegridadmin:
1 | icegridadmin --Ice.Config=config.cfg |
或直接在启动 master registry 时部署应用: 1
icegridnode --Ice.IPv6=0 --daemon --nochdir --Ice.Config=registry.cfg --deploy app.xml
此时,只是将部署文件加载到 Registry Node 有可能没有启动,待 Node 启动之后再将部署信息分发下去。
关键配置信息
Endponts
在上文中,除了 IceGrid.Registry.Client.Endpoints,
我们指定了固定的端口,其它 Endpoint
并没有指定端口,在一些场景下,我们可能需要知道明确的端口方便做网络策略,这时候便需要设置固定端口。
Registry Endpoints 1
2
3IceGrid.Registry.Client.Endpoints=tcp -h 127.0.0.1 -p 4061
IceGrid.Registry.Server.Endpoints=tcp -p 300001
IceGrid.Registry.Internal.Endpoints=tcp -p 30002
Node Endpoints
1 | IceGrid.Node.Endpoints=tcp -p 30003 |
Adapter Endpoints
1 | PrinterAdapter.Endpoints=tcp -p 30000 |
设置 Adapter Eendpoints 也可以在代码中或部署文件中定义:
1 | String endpoints = "tcp -p 30000"; |
部署文件:
1 | <adapter name="FMServerAdapter" endpoints="tcp 30000" replica-group="ReplicatedHelloAdapter"/> |
日志
引入 Ice 之后,系统会变得复杂,为了方便问题定位,我们需要获取更多的运行时信息,输出运行时的日志就比较关键。我们可以对不同的服务进行日志的输出配置。
Registry, Node, Apdater 通用
1 | Ice.LogFile=E:\bell-lab\ice\deploy-1\master\logfile.log |
参数说明:
- Ice.LogFile: 配置日志文件;
- Ice.StdErr: 标准错误 IO 输出文件;
- ce.StdOut: 标准控制台输出文件;
Node 日志 1
IceGrid.Node.Output=E:\bell-lab\ice\deploy-1\node1\db
参数说明:
- IceGrid.Node.Output:Node 日志输出目录,它会将运行在该结点下的 Apater 日志输出到该目录;
Adapter 日志 1
2
3localInitializationData.properties.setProperty("Ice.Trace.Network","2");
localInitializationData.properties.setProperty("Ice.Trace.Protocol","1");
localInitializationData.properties.setProperty("Ice.Trace.Locator","2");
参数说明:
- Ice.Trace.Network: 控制网络连接日志的输出级别;
- Ice.Trace.Protocol: 控制输出 Ice Message;
- Ice.Trace.Locator: 控制 Adpater 注册及查询信息的输出级别;
具体详情可以见官网。
Registry 与 Node 同一进程部署
Registry 与 Node
可以有多种部署方式,可以独立部署,也可以部署到同一个进程中。如何部署可以通过参数进行配置:
1
IceGrid.Node.CollocateRegistry=0
参数说明:
- IceGrid.Node.CollocateRegistry: 0 表示分开部署,1 表示同一个进程部署。
Registry 主从配置
为了实现高可用,Registry
可以主从部署,可以通过下面的参数指定主从身份: 1
IceGrid.Registry.ReplicaName=Master/Replic1/Replica2
参数说明:
- IceGrid.Registry.ReplicaName: Master Registry 默认为 Master, 可以不配置,Repica Registry 根据需要配置为 ReplicaN,或其它名字。
参考: