Springboot 系列:Cache
这篇文章主要讲述如何在 Springboot 中集成 Redis Cache 功能。
概述
在 Springboot 项目中引入 Redis Cache 包含以下三个步骤:
- 安装部署 Redis;
- 引入相关依赖;
- 开启 Cache 功能,并使用 @Cacheable 、@CachePut 、@CacheEvict 、@Caching 等 annotaion 标注需要使用 Cache 的方法;
第一个步骤可以参考其它文章,我们重点介绍后面两个步骤。
引入依赖
主要是引入两个依赖,分别是 Spring Cache 和 Redis 相关的依赖。
1 | <!-- cache --> |
开启 Cache
首先在引入缓存的方法上添加相关的 annotaion, 如下代码如下:
1 |
|
最后使用 @EnableCaching 开启缓存功能即可。
基本原理
Cache Anotation
在 Spring Caceh
中,有两个关键的接口:org.springframework.cache.Cache 和
org.springframework.cache.CacheManager.
两个接口用来统一不同的缓存技术,Cache
接口是对缓存的抽象,它包含了基本的操作,如增加、删除、读取等,CacheManager
是管理 Cache 的接口,通过它可以获取具体的 Cache
实现类。不同的缓存技术需要实现这两个接口,并添加到 Spring 容器中,由
Spring 统一管理。data-redis 便实现了这两个接口。
Spring Cache 本质是在使用缓存的方法上加入一个过滤器,根据方法的输入参数和输出结果生成一个缓存的 Key, 并将返回结果缓存到指定的 Key 上。 怎么标注要使用缓存的方法呢? 在 Spring 中引入了如下的 annotation, 它们主要是应用在方法上。
- @Cacheable: 主要是用在查询方法上,用于将返回结果缓存到 Cache 中,该 annotation 在方法调用前先判断缓存是否存在,如果存在则直接返回缓存的值;如果缓存不存在,则执行方法,并将返回结果缓存到 Cache 中;
- @CachePut:用于将返回结果缓存到 Cache 中;
- @CacheEvict:用于清空指定的缓存,可以通过 beforeInvocation 参数控制执行的时间,若为 true, 则在方法前执行,反之方法后执行;
- @Caching:该注解可以实现同一个方法上同时使用多种注解,如 Cacheable, CachePut, CacheEvict;
Cache 参数配置:
- @CacheConfig:用于配置 Cache 相关参数,如:cacheNames, keyGenerator, cacheManager 和 cacheResolver, 一般配置在类上;
- @EnableCaching:开启缓存功能,一般放在启动类上;
在方法上添加了 @Cacheable, @CachePut, @CacheEvict 和 @Caching annotaion 之后,Spring 使用 Aop
技术,在方法中会添加一个 CacheInterceptor
过滤器,其核心代码如下: 1
2
3
4
5
6
7
8
9
10
11
12
13
14
15
16
17
18
19
20
21
22
23
24
25
26
27
28
29
30
31
32
33
34
35
36
37
38
39
40
41
42
43
44// CacheAspectSupport
private Object execute(final CacheOperationInvoker invoker, Method method, CacheOperationContexts contexts) {
// ...
// 1、若有CacheEvict,且设置 beforeInvocation 为 true, 则在方法前执行 CacheEvict 操作;
processCacheEvicts(contexts.get(CacheEvictOperation.class), true,
CacheOperationExpressionEvaluator.NO_RESULT);
// 2、若有 Cacheable,则执行查询操作;
Cache.ValueWrapper cacheHit = findCachedItem(contexts.get(CacheableOperation.class));
List<CachePutRequest> cachePutRequests = new LinkedList<>();
if (cacheHit == null) {
collectPutRequests(contexts.get(CacheableOperation.class),
CacheOperationExpressionEvaluator.NO_RESULT, cachePutRequests);
}
Object cacheValue;
Object returnValue;
if (cacheHit != null && !hasCachePut(contexts)) {
// 2.1 若缓存命中(存在)且没有 CachePut 操作,则将缓存内容包装成返回结果;
cacheValue = cacheHit.get();
returnValue = wrapCacheValue(method, cacheValue);
}
else {
// 2.2 若缓存没有命中,则调用方法,并包装返回结果;
returnValue = invokeOperation(invoker);
cacheValue = unwrapReturnValue(returnValue);
}
// 3、收集 cachePut 操作;
collectPutRequests(contexts.get(CachePutOperation.class), cacheValue, cachePutRequests);
// 4、如果有 cachePut 或 Cacheable 未命中,则执行写入缓存操作;
for (CachePutRequest cachePutRequest : cachePutRequests) {
cachePutRequest.apply(cacheValue);
}
// 5、若有CacheEvict,且设置 beforeInvocation 为 false, 则在方法后执行 CacheEvict 操作
processCacheEvicts(contexts.get(CacheEvictOperation.class), false, cacheValue);
return returnValue;
}
- 判断是否有 CacheEvict annotation, 若有 CacheEvict,且设置 beforeInvocation 为 true, 则在方法前执行 CacheEvict 操作;
- 判断是否有 Cacheable annotation, 若有 Cacheable,则直接从 Cache 中读取内容:1) 若缓存命中(存在)且没有 CachePut 操作,则将缓存内容包装成返回结果; 2) 若缓存没有命中,则调用方法,并包装返回结果;
- 收集 cachePut 操作, 如果有 cachePut 或 Cacheable 未命中,则执行写入缓存操作;
- 最后判断是否有 CacheEvict, 若有 CacheEvict,且设置 beforeInvocation 为 false, 则在方法后执行 CacheEvict 操作。
说明:使用 @Cacheable, @CachePut annotaion, 方法签名中必须有返回结果,否则将存储 NULL 对象。
加载 CacheInterceptor
CacheInterceptor 是实现缓存存储逻辑的关键,在启动类加上 @EnableCaching annotaion,通过 CachingConfigurationSelector 类引入 ProxyCachingConfiguration Configuration 类. 而 CacheInterceptor 就是由 ProxyCachingConfiguration 定义生成的。 Cache, CacheManager 是 Spring 定义的 SPI 接口,通过引入 spring-boot-starter-data-redis 依赖,将 RedisCache, RedisCacheManager 加入到项目中,最后结合 Springboot 的 autoconfigure 技术将这两个实现类加入容器中,从而被 CacheInterceptor 引用到。
代码实例
以代码为例,使用 mybatis 作为 ORM 框架,使用 Redis
作为缓存的后端实现,版本约定如下: 1
2
3
4
5
6
7
8<properties>
<!-- spring-boot version -->
<spring-boot.version>2.2.5.RELEASE</spring-boot.version>
<mysql.driver.version>8.0.16</mysql.driver.version>
<mybatis-spring-boot.version>1.3.5</mybatis-spring-boot.version>
</properties>
定义 User Bean
1 | public class User implements Serializable { |
id 字段为用户表主键,在插入时需要从数据库返回用于缓存的 Key.
定义 User Mapper
1 | public interface UserMapper { |
说明:在执行 insert 操作时,使用
@Options(useGeneratedKeys = true, keyProperty = "id")
返回自增主键。
扫描 Mapper
在启动类中加入 @MapperScan("org.noahsark.cache.mapper"),
指定扫描的 Mapper 对象。
定义 User Service
在 Service 类中加入对缓存的操作,如下所示: 1
2
3
4
5
6
7
8
9
10
11
12
13
14
15
16
17
18
19
20
21
22
23
24
25
26
27
28
29
30
31
32
33
34
35
36
37
38
public class UserService {
private UserMapper userMapper;
public List<User> getUsers() {
List<User> users = userMapper.getAll();
return users;
}
public User getUser(Integer id) {
User user = userMapper.getUser(id);
return user;
}
public User save(User user) {
userMapper.insert(user);
return user;
}
public User update(User user) {
userMapper.update(user);
return user;
}
public void delete(Integer id) {
userMapper.delete(id);
}
}
说明:
- @Cacheable,@CachePut annotation 的方法签名必须有返回结果;
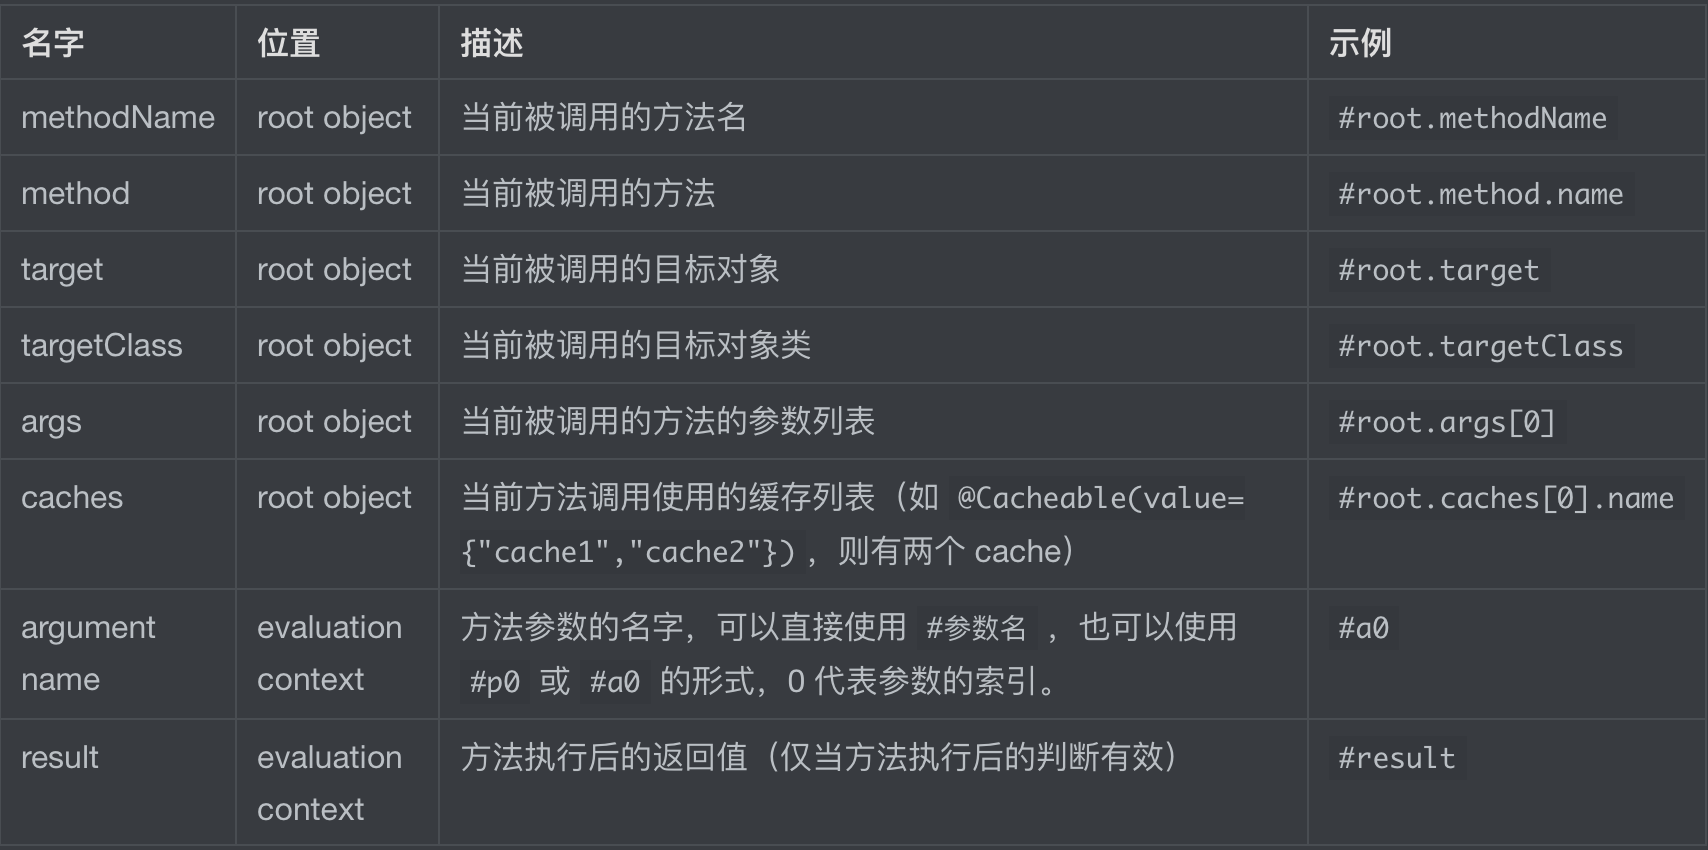
- Redis 使用 String 格式存储数据,完整的 key 为:users::#id, id 为具体的值;
key 参数使用 spEL 表达式,可以包含以下参数: 
开启缓存
1 |
|
在启动类中加入 @EnableCaching.
工程代码:https://github.com/noahsarkzhang-ts/springboot-lab/tree/main/springcloud-cache
参考: