Spring Cloud Gateway 是 Spring Cloud
生态中作为网关的组件,它基于 WebFlux 框架实现,使用的是 Reactor
的编程模式,底层则使用了高性能的通信框架 Netty。本文主要讲述
Spring Cloud Gateway
的使用,如路由、统一认证、限流等功能。
概述
基本概念
Route(路由): 网关配置的基本组成模块,一个 Route
模块由一个 ID,一个目标
URI,一组断言和一组过滤器组成。如果断言为真,则路由匹配,目标 URI
会被访问。
Predicate(断言): 这是一个 Java 8 的
Predicate,可以使用它来匹配来自 HTTP 请求的任何内容,例如
headers 或参数。断言的输入类型是一个
ServerWebExchange。
Filter(过滤器) 它们
Spring Framework GatewayFilter
的实例类,可以在向下游发送请求之前或之后修改请求和响应数据。
工作流程
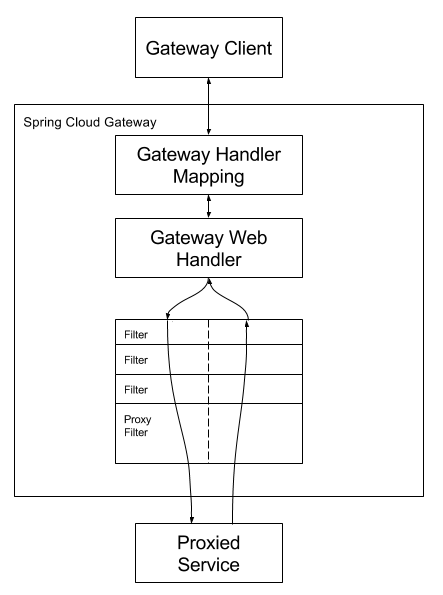
下图展示了 Spring Cloud Gateway 的工作流程: 
- 客户端向
Spring Cloud Gateway 发送请求;
- 如果
Gateway Handler Mapping 判定请求匹配到一个
Route, 则把请求发送到
Gateway Web Handler;
Gateway Web Handler
执行一个过滤器链来处理请求,过滤器可以在发送请求之前执行,也可以在之后执行;- 所有的
pre 过滤器在发送请求前执行,所有的
post 过滤器将在发送请求收到响应之后执行;
- 过滤器可以修改请求和响应的数据。
前置条件
提前约定,本文涉及到版本如下:
1
2
3
4
5
6
7
8
9
10
11
12
|
<properties>
<spring-boot.version>2.2.5.RELEASE</spring-boot.version>
<spring-cloud.version>Hoxton.SR3</spring-cloud.version>
<spring-cloud-alibaba.version>2.2.1.RELEASE</spring-cloud-alibaba.version>
</properties>
|
路由
路由分为两类:1)基本路由,指定路由的目的地址; 2)
服务路由,从服务注册中心选取路由的地址。其配置如下所示:
1
2
3
4
5
6
7
8
9
10
11
12
13
14
15
16
17
| spring:
application:
name: api-gateway
cloud:
gateway:
routes:
- id: url-config
uri: http://localhost:9091
predicates:
- Path=/configs/**
filters:
- StripPrefix=1
- id: services-config
uri: lb://service-provider
predicates:
- Path=/services/**
|
一个 Route 包含如下的内容:
- id: 唯一标识这个 Route;
- uri: 路由的目的地址,可以指定一个地址,如
http://ip:port,也可以指定服务名称,如
lb://serviceName;
- predicates: 断言,路由的判定条件;
- filters: 过滤器,可以修改请求或响应的内容。
Predicate
Predicate 来源于 Java 8,是 Java 8 中引入的一个函数,Predicate
接受一个输入参数,返回一个布尔值结果。该接口包含多种默认方法来将
Predicate
组合成其他复杂的逻辑(比如:与,或,非)。可以用于接口请求参数校验、判断新老数据是否有变化需要进行更新操作。
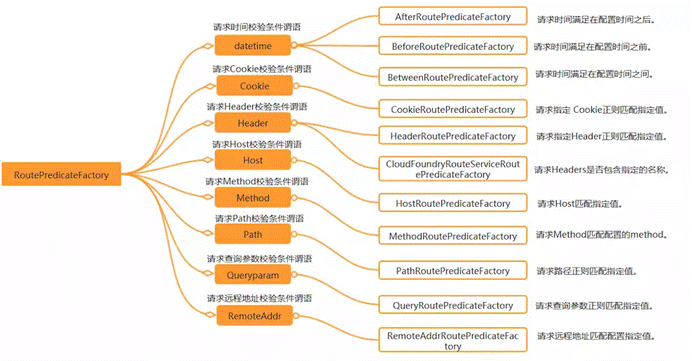
在 Spring Cloud Gateway 中 Spring 利用 Predicate
的特性实现了各种路由匹配规则,有通过
Header、请求参数等不同的条件来进行作为条件匹配到对应的路由,如下图所示:

Filter
Filter 可以对请求或响应进行修改,常用的过滤器有:
| 过滤规则 |
实例 |
说明 |
| StripPrefix |
- StripPrefix=1 |
从请求路径中移除一个前缀,如 /configs/cache --> /cache |
| PrefixPath |
- PrefixPath=/app |
在请求路径前加上 app |
| RewritePath |
- RewritePath=/test,/app/test |
访问 localhost:9022/test, 请求会转发到 localhost:8001/app/test |
| SetPath |
SetPath=/app/{path} |
通过模板设置路径,转发的规则时会在路径前增加 app,{path}
表示原请求路径 |
| RemoveRequestHeader |
- RemoveResponseHeader=X-Response-Foo |
返回给客户端前去掉某个请求头信息 |
| AddRequestHeader |
- AddRequestHeader=X-Request-red, blue |
向下游请求前加上某个请求头信息 |
更多 Filter 可以参考官网:Filter
配置
集成服务注册中心
在 Spring Cloud Gateway
中可以集成服务注册中心,网关也可以作为服务消费方注册上去,在这里,以
Nacos 为例。
配置
1
2
3
4
5
6
7
| spring:
application:
name: api-gateway
cloud:
nacos:
discovery:
server-addr: localhost:8848
|
开启服务发现
在启动类加上 @EnableDiscoveryClient annotation.
Nacos 的安装使用可以参考本系列的相关文章。
Maven 依赖
需要引入 Nacos 及 Spring Cloud Gateway
相关的包:
1
2
3
4
5
6
7
8
| <dependency>
<groupId>org.springframework.cloud</groupId>
<artifactId>spring-cloud-starter-gateway</artifactId>
</dependency>
<dependency>
<groupId>com.alibaba.cloud</groupId>
<artifactId>spring-cloud-starter-alibaba-nacos-discovery</artifactId>
</dependency>
|
统一认证
假定已经有认证服务器且使用 JWT Token,
Spring Cloud Gateway
在认证体系中主要是作为资源服务器的角色,从请求中获取
JWT Token, 并验证其合法性。整体上来说,分为两个步骤:
- 实例化
SecurityWebFilterChain
对象,设置安全相关的参数;
- 开启资源服务器功能。
开启资源服务器功能
第二步相对比较简单,在资源服务器的配置类上加入
@EnableWebFluxSecurity annotation 即可,如下图所示:
1
2
3
4
5
| @Configuration
@EnableWebFluxSecurity
public class ResourceServerConfig {
}
|
实例化
SecurityWebFilterChain 对象
SecurityWebFilterChain 对象是
SpringSecurity
体系中比较重要的类,它代表了一个请求处理链,定义的形式如下:
1
2
3
4
5
6
7
8
9
10
11
12
13
14
15
16
17
18
19
20
21
22
23
24
25
26
27
28
| @Bean
public SecurityWebFilterChain securityWebFilterChain(ServerHttpSecurity http) {
http.oauth2ResourceServer().jwt().jwtAuthenticationConverter(jwtAuthenticationConverter());
http.oauth2ResourceServer().authenticationEntryPoint(authenticationEntryPoint());
http.addFilterBefore(ignoreUrlsRemoveJwtFilter, SecurityWebFiltersOrder.AUTHENTICATION);
http.authorizeExchange()
.pathMatchers(Convert.toStrArray(ignoreUrlsConfig.getUrls())).permitAll()
.anyExchange().access(authorizationManager)
.and()
.exceptionHandling()
.accessDeniedHandler(accessDeniedHandler())
.authenticationEntryPoint(authenticationEntryPoint())
.and().csrf().disable();
return http.build();
}
|
自定义 JWT 权限转换器
由于 Gateway 没有将 JWT Claim 中 authorities 值加入到 Authentication
权限里面,所以需要自定义一个 JwtGrantedAuthoritiesConverter
对象,提取 JWT Claim 中的 authorities 权限值。
1
2
3
4
5
6
7
8
9
10
| @Bean
public Converter<Jwt, ? extends Mono<? extends AbstractAuthenticationToken>> jwtAuthenticationConverter() {
JwtGrantedAuthoritiesConverter jwtGrantedAuthoritiesConverter = new JwtGrantedAuthoritiesConverter();
jwtGrantedAuthoritiesConverter.setAuthorityPrefix(AuthConstant.AUTHORITY_PREFIX);
jwtGrantedAuthoritiesConverter.setAuthoritiesClaimName(AuthConstant.JWT_AUTHORITIES_KEY);
JwtAuthenticationConverter jwtAuthenticationConverter = new JwtAuthenticationConverter();
jwtAuthenticationConverter.setJwtGrantedAuthoritiesConverter(jwtGrantedAuthoritiesConverter);
return new ReactiveJwtAuthenticationConverterAdapter(jwtAuthenticationConverter);
}
|
另外,Gateway
作为资源服务器,需要访问认证服务器获取解密的密钥,所以在配置文件中配置认证服务器获取密钥的
URL.
1
2
3
4
5
6
| spring:
security:
oauth2:
resourceserver:
jwt:
jwk-set-uri: http://localhost:8080/oauth/public-key
|
自定义 token 无效或者已过期处理逻辑
当 token 无效或已过期,自定义一个返回结果,并指定一个错误码。
1
2
3
4
5
6
7
8
| @Bean
ServerAuthenticationEntryPoint authenticationEntryPoint() {
return (exchange, e) -> {
Mono<Void> mono = Mono.defer(() -> Mono.just(exchange.getResponse()))
.flatMap(response -> ResponseUtils.writeErrorInfo(response, ResultCode.TOKEN_INVALID_OR_EXPIRED));
return mono;
};
}
|
自定义 "访问禁止" 的异常处理逻辑
与 token 无效或已过期一样,统一定义一个错误码返回即可。
1
2
3
4
5
6
7
8
| @Bean
ServerAccessDeniedHandler accessDeniedHandler() {
return (exchange, denied) -> {
Mono<Void> mono = Mono.defer(() -> Mono.just(exchange.getResponse()))
.flatMap(response -> ResponseUtils.writeErrorInfo(response, ResultCode.ACCESS_UNAUTHORIZED));
return mono;
};
}
|
自定义 Filter
可以根据需求,在 FilterChain 中加入自定义的 Filter,
处理特定的业务,在这里,我们加入一个 Filter, 用于清除请求头
Authorization 中的内容。
1
2
3
4
5
6
7
8
9
10
11
12
13
14
15
16
17
18
19
20
21
22
23
| @Component
public class IgnoreUrlsRemoveJwtFilter implements WebFilter {
@Autowired
private IgnoreUrlsConfig ignoreUrlsConfig;
@Override
public Mono<Void> filter(ServerWebExchange exchange, WebFilterChain chain) {
ServerHttpRequest request = exchange.getRequest();
URI uri = request.getURI();
PathMatcher pathMatcher = new AntPathMatcher();
List<String> ignoreUrls = ignoreUrlsConfig.getUrls();
for (String ignoreUrl : ignoreUrls) {
if (pathMatcher.match(ignoreUrl, uri.getPath())) {
request = exchange.getRequest().mutate().header("Authorization", "").build();
exchange = exchange.mutate().request(request).build();
return chain.filter(exchange);
}
}
return chain.filter(exchange);
}
}
|
自定义 AuthorizationManager
除了白名单中的 URL,其它 URL
都需要进行权限判断。在这里,需要自定义一个
ReactiveAuthorizationManager
管理器,封装访问权限逻辑。其形式如下所示:
1
2
3
4
5
6
7
8
9
10
11
12
13
14
15
16
17
18
19
20
21
22
23
24
25
26
27
28
29
30
31
32
33
34
35
36
37
38
39
40
41
42
43
44
45
46
47
48
49
50
51
52
53
54
55
56
57
58
59
60
61
62
63
64
65
66
| @Component
public class AuthorizationManager implements ReactiveAuthorizationManager<AuthorizationContext> {
private static final Logger LOGGER = LoggerFactory.getLogger(AuthorizationManager.class);
@Autowired
private RedisTemplate redisTemplate;
@Override
public Mono<AuthorizationDecision> check(Mono<Authentication> mono, AuthorizationContext authorizationContext) {
ServerHttpRequest request = authorizationContext.getExchange().getRequest();
if (request.getMethod() == HttpMethod.OPTIONS) {
return Mono.just(new AuthorizationDecision(true));
}
PathMatcher pathMatcher = new AntPathMatcher();
String method = request.getMethodValue();
String path = request.getURI().getPath();
String restfulPath = method + ":" + path;
LOGGER.info("restfulPath: {}", restfulPath);
Map<String, Object> urlPermRolesRules = redisTemplate.opsForHash().entries(CacheConstants.RESOURCE_ROLES_MAP);
List<String> authorizedRoles = new ArrayList<>();
for (Map.Entry<String, Object> permRoles : urlPermRolesRules.entrySet()) {
String perm = permRoles.getKey();
if (pathMatcher.match(perm, restfulPath)) {
List<String> roles = Convert.toList(String.class, permRoles.getValue());
authorizedRoles.addAll(Convert.toList(String.class, roles));
}
}
LOGGER.info("authorizedRoles: {}", authorizedRoles);
Mono<AuthorizationDecision> authorizationDecisionMono = mono
.filter(Authentication::isAuthenticated)
.flatMapIterable(Authentication::getAuthorities)
.map(GrantedAuthority::getAuthority)
.any(authority -> {
String roleCode = authority.substring(AuthConstant.AUTHORITY_PREFIX.length());
boolean hasAuthorized = CollectionUtil.isNotEmpty(authorizedRoles) && authorizedRoles.contains(roleCode);
return hasAuthorized;
})
.map(AuthorizationDecision::new)
.defaultIfEmpty(new AuthorizationDecision(false));
return authorizationDecisionMono;
}
}
|
访问权限的判定可以用一句话来描述:获取有权限访问该请求 URL
的角色列表,然后判断 JWT
中携带的用户角色是否包含在角色列表中,如果包含,则通过,反之则不通过。
Maven 依赖
需要引入 SpringSecurity, Oauth2
相关的包:
1
2
3
4
5
6
7
8
9
10
11
12
13
14
15
16
17
18
19
20
21
22
23
24
25
| <dependency>
<groupId>org.springframework.cloud</groupId>
<artifactId>spring-cloud-starter-oauth2</artifactId>
</dependency>
<dependency>
<groupId>org.springframework.security</groupId>
<artifactId>spring-security-oauth2-resource-server</artifactId>
</dependency>
<dependency>
<groupId>org.springframework.security</groupId>
<artifactId>spring-security-oauth2-jose</artifactId>
</dependency>
<dependency>
<groupId>org.springframework.security</groupId>
<artifactId>spring-security-config</artifactId>
</dependency>
<dependency>
<groupId>com.nimbusds</groupId>
<artifactId>nimbus-jose-jwt</artifactId>
<version>8.16</version>
</dependency>
|
限流
从 1.6.0 版本开始,Sentinel 提供了 Spring Cloud Gateway
的适配模块,可以提供两种资源维度的限流:
- route 维度:即在 Spring 配置文件中配置的路由条目,资源名为对应的
routeId;
- 自定义 API 维度:用户可以利用 Sentinel 提供的 API 来自定义一些 API
分组。
引入 Sentinel
引入 Sentinel 包含如下步骤:
- 加入 Sentinel 配置文件;
- 加入自定义业务逻辑。
加入 Sentinel 配置文件
1
2
3
4
5
6
7
8
9
10
| spring:
cloud:
sentinel:
filter:
enabled: false
eager: true
transport:
dashboard: localhost:8090
|
加入自定义业务逻辑
整体的结构如下所示:
1
2
3
4
5
6
7
8
9
10
11
12
13
14
15
16
17
18
| @Configuration
public class GatewayConfiguration {
private static final Logger LOGGER = LoggerFactory.getLogger(GatewayConfiguration.class);
@PostConstruct
public void doInit() {
initBlockHandlers();
initCustomizedApis();
initGatewayRules();
}
}
|
自定义业务逻辑包括:
- 自定义限流处理器:可以自定义返回的业务信息,否则返回默认的信息,如:Blocked
by Sentinel: FlowException;
- 自定义 api 组:可以将分散的 URL
加入到一个分组,使用统一的限流逻辑;
- 自定义网关 Rules:可以根据 Roule ID, api 分组进行限流配置;
自定义限流处理器
可以将限流的异常转译为业务上错误码返回。
1
2
3
4
5
6
7
8
9
10
11
12
| public void initBlockHandlers() {
BlockRequestHandler blockHandler = (serverWebExchange, throwable) -> {
LOGGER.info("Sentinel Block request!!");
return ServerResponse.status(HttpStatus.TOO_MANY_REQUESTS)
.contentType(MediaType.APPLICATION_JSON)
.bodyValue(JSONUtil.toJsonStr(Result.failed(ResultCode.FLOW_LIMITING)));
};
GatewayCallbackManager.setBlockHandler(blockHandler);
}
|
自定义 api 组
将 /configs/**,/services/** 归到一个 api
分组,并命名为 some_customized_api, 用于后续的限流配置。
1
2
3
4
5
6
7
8
9
10
11
12
| private void initCustomizedApis() {
Set<ApiDefinition> definitions = new HashSet<>();
ApiDefinition api1 = new ApiDefinition("some_customized_api")
.setPredicateItems(new HashSet<ApiPredicateItem>() {{
add(new ApiPathPredicateItem().setPattern("/configs/**"));
add(new ApiPathPredicateItem().setPattern("/services/**")
.setMatchStrategy(SentinelGatewayConstants.URL_MATCH_STRATEGY_PREFIX));
}});
definitions.add(api1);
GatewayApiDefinitionManager.loadApiDefinitions(definitions);
}
|
自定义网关 Rules
为 koala-oauth,koala-oauth2-api Route ID
设置不同的限流参数,同时也可以为 some_customized_api
配置限流参数。
1
2
3
4
5
6
7
8
9
10
11
12
13
14
15
16
17
18
19
20
21
22
23
24
25
26
27
28
| private void initGatewayRules() {
Set<GatewayFlowRule> rules = new HashSet<>();
rules.add(new GatewayFlowRule("koala-oauth")
.setCount(10)
.setIntervalSec(1)
);
rules.add(new GatewayFlowRule("koala-oauth2-api")
.setCount(2)
.setIntervalSec(2)
.setBurst(2)
.setParamItem(new GatewayParamFlowItem()
.setParseStrategy(SentinelGatewayConstants.PARAM_PARSE_STRATEGY_CLIENT_IP)
)
);
rules.add(new GatewayFlowRule("some_customized_api")
.setResourceMode(SentinelGatewayConstants.RESOURCE_MODE_CUSTOM_API_NAME)
.setCount(5)
.setIntervalSec(1)
.setParamItem(new GatewayParamFlowItem()
.setParseStrategy(SentinelGatewayConstants.PARAM_PARSE_STRATEGY_URL_PARAM)
.setFieldName("pn")
)
);
GatewayRuleManager.loadRules(rules);
}
|
启动控制台
1
| java -Dserver.port=8080 -Dcsp.sentinel.dashboard.server=localhost:8080 -Dproject.name=sentinel-dashboard -Dcsp.sentinel.app.type=1 -jar sentinel-dashboard.jar
|
其中 -Dserver.port=8080 用于指定 Sentinel 控制台端口为 8080,
-Dcsp.sentinel.app.type 用于指定网关类型。
从 Sentinel 1.6.0 起,Sentinel
控制台引入基本的登录功能,默认用户名和密码都是 sentinel。
Maven 依赖
1
2
3
4
5
6
7
8
9
|
<dependency>
<groupId>com.alibaba.cloud</groupId>
<artifactId>spring-cloud-alibaba-sentinel-gateway</artifactId>
</dependency>
<dependency>
<groupId>com.alibaba.cloud</groupId>
<artifactId>spring-cloud-starter-alibaba-sentinel</artifactId>
</dependency>
|
工程代码:https://github.com/noahsarkzhang-ts/springboot-lab/tree/main/springcloud-koala
参考:
1.
Spring Cloud Gateway 官网
2.
网关限流

