最简单的视频播放器
基于雷霄骅大佬的文章,学习并改造了一个简单的视频播放器,该播放器基于 FFmpeg 和 SDL 2.0。
播放器原理
播放器包含一两个步骤:
- 使用
FFmpeg解码音视频文件,读取YUV视频帧数据; - 将
YUV视频帧数据写入到SDL窗口中进行显示。
FFmpeg 解码流程
FFmpeg 解码流程如下图所示: 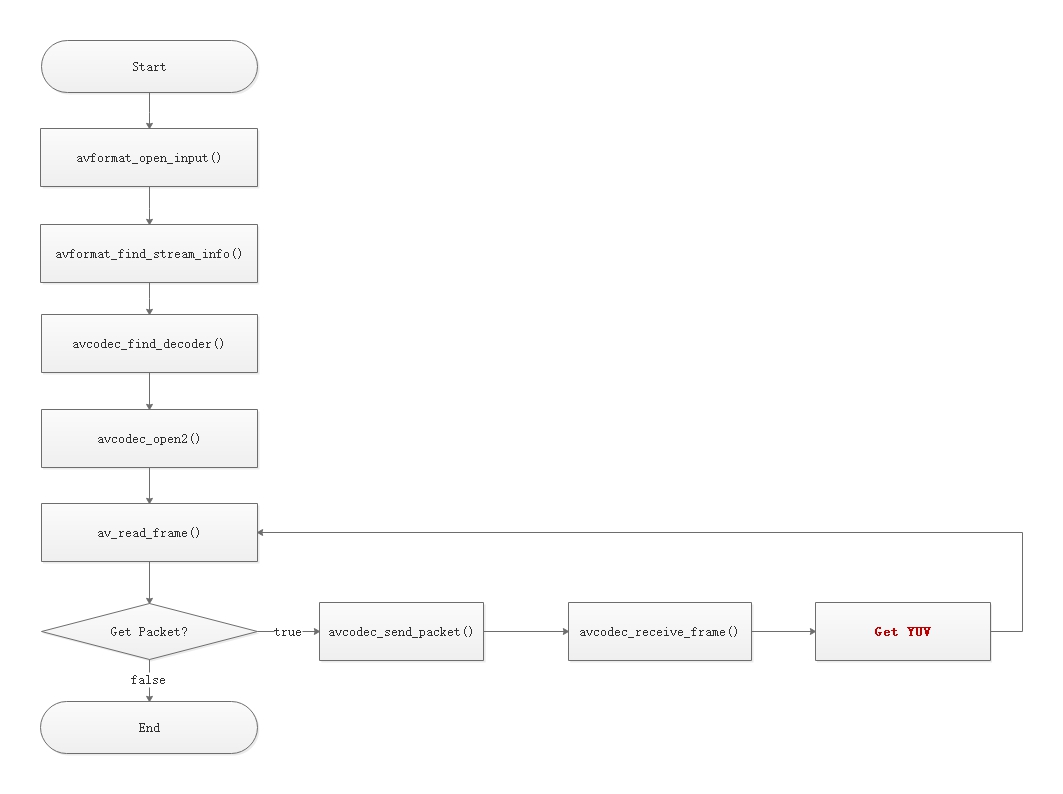
解码过程中涉及如下的对象: 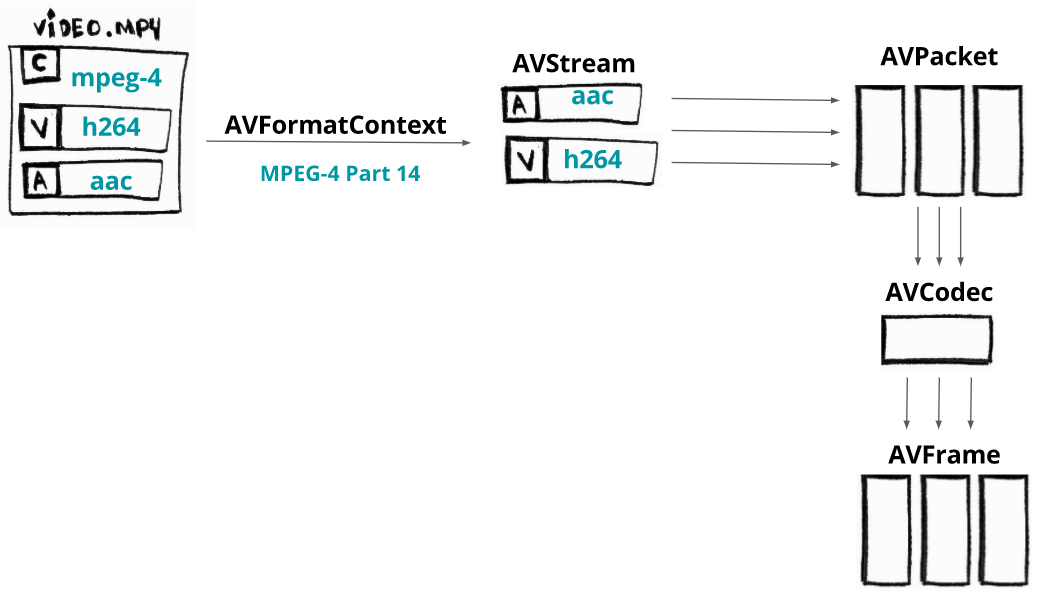
首先,我们需要加载媒体文件到 AVFormatContext
组件(为便于理解,容器看作是文件格式即可)。这个过程并不是加载整个文件,它通常只是加载了文件头。
我们加载容器的头部信息后,就可以访问媒体文件流(流可以认为是音频和视频数据),每个流用
AVStream 组件表示。
流是数据流的一个昵称
假设我们的视频文件包含两个流:一个是 AAC 音频流,一个是
H264(AVC)视频流。我们可以从每一个流中提取出被称为数据包的数据片段(切片),这些数据包将被加载到
AVPacket 组件中。
数据包中的数据仍然是被编码的(被压缩),为了解码这些数据,我们需要将这些数据给到
AVCodec。
AVCodec 将解码这些数据到
AVFrame,最后我们将得到解码后的帧。注意,视频流和音频流共用此处理流程。
SDL 显示流程
SDL 整体的显示流程如下所示: 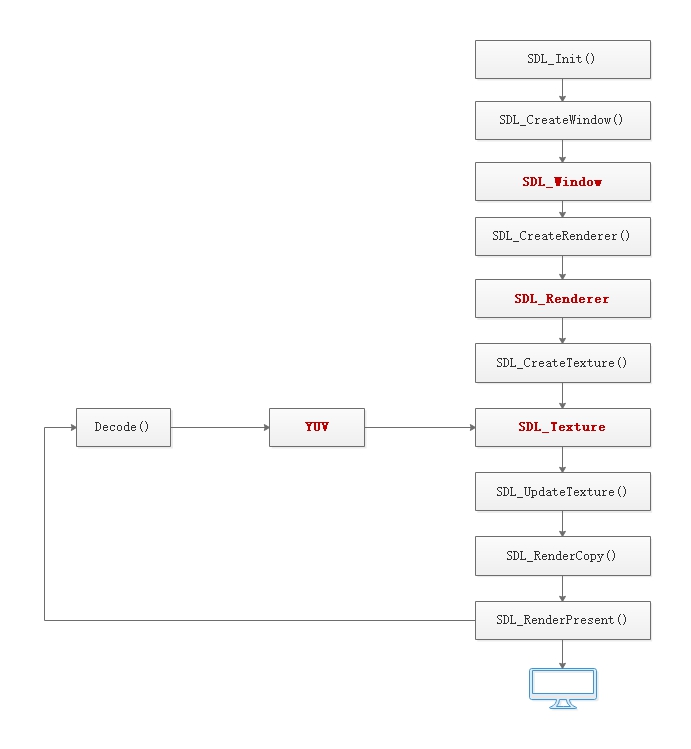
几个变量之间的关系:
- SDL_Window:播放器窗口。在 SDL1.x 版本中,只可以创建一个一个窗口,在SDL2.0版本中,可以创建多个窗口。
- SDL_Texture:用于显示 YUV 数据,一个 SDL_Texture 对应一帧 YUV 数据。
- SDL_Renderer:用于渲染 SDL_Texture 至 SDL_Window。
- SDL_Rect:用于确定 SDL_Texture 显示的位置。注意:一个 SDL_Texture 可以指定多个不同的 SDL_Rect,这样就可以在 SDL_Window 不同位置显示相同的内容(使用SDL_RenderCopy()函数)。
这些对象之间的关系如下图所示: 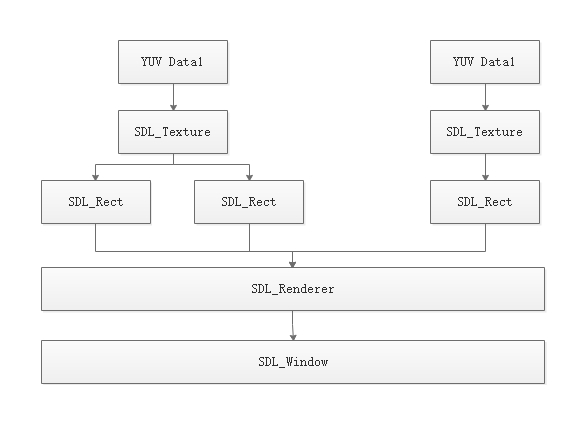
下图举了个例子,指定了4个SDL_Rect,可以实现4分屏的显示。 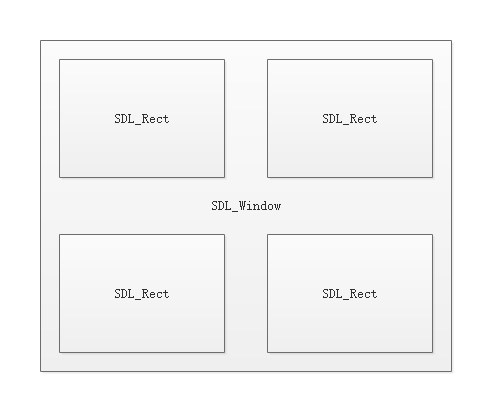
FFmpeg 解码代码分析
创建 AVFormatContext 对象
我们首先为 AVFormatContext
分配内存,利用它可以获得相关格式(容器)的信息。 1
AVFormatContext *pFormatContext = avformat_alloc_context();
我们将打开一个文件并读取文件的头信息,利用相关格式的简要信息填充
AVFormatContext。需要使用 avformat_open_input
函数,该函数需要
AVFormatContext、文件名和两个可选参数:AVInputFormat(如果为NULL,FFmpeg将猜测格式)、AVDictionary(解封装参数)。
1
avformat_open_input(&pFormatContext, filename, NULL, NULL);
可以输出视频的格式和时长: 1
printf("Format %s, duration %lld us", pFormatContext->iformat->long_name, pFormatContext->duration);
获取音视频流
为了访问数据流,我们需要从媒体文件中读取数据。需要利用函数
avformat_find_stream_info
完成此步骤。pFormatContext->nb_streams
将获取所有的流信息,并且通过 pFormatContext->streams[i]
获取到指定的 i 数据流(AVStream)。 1
avformat_find_stream_info(pFormatContext, NULL);
可以使用循环来获取所有流数据: 1
2
3
4for (int i = 0; i < pFormatContext->nb_streams; i++)
{
//
}
打开编码器
针对每个流维护一个对应的
AVCodecParameters,该结构体描述了被编码流的各种属性。
1
AVCodecParameters *pLocalCodecParameters = pFormatContext->streams[i]->codecpar;
codec id 和
avcodec_find_decoder 函数可以找到对应已经注册的解码器,返回
AVCodec 指针,该组件能让我们知道如何编解码这个流。
1 | AVCodec *pLocalCodec = avcodec_find_decoder(pLocalCodecParameters->codec_id); |
现在可以输出一些编解码信息。 1
2
3
4
5
6
7
8// 用于视频和音频
if (pLocalCodecParameters->codec_type == AVMEDIA_TYPE_VIDEO) {
printf("Video Codec: resolution %d x %d", pLocalCodecParameters->width, pLocalCodecParameters->height);
} else if (pLocalCodecParameters->codec_type == AVMEDIA_TYPE_AUDIO) {
printf("Audio Codec: %d channels, sample rate %d", pLocalCodecParameters->channels, pLocalCodecParameters->sample_rate);
}
// 通用
printf("\tCodec %s ID %d bit_rate %lld", pLocalCodec->long_name, pLocalCodec->id, pCodecParameters->bit_rate);
利用刚刚获取的 AVCodec 为 AVCodecContext
分配内存,它将维护解码/编码过程的上下文。 然后需要使用
avcodec_parameters_to_context和被编码流的参数
AVCodecParameters 来填充 AVCodecContext。
完成上下文填充后,使用 avcodec_open2 来打开解码器。
1
2
3AVCodecContext *pCodecContext = avcodec_alloc_context3(pCodec);
avcodec_parameters_to_context(pCodecContext, pCodecParameters);
avcodec_open2(pCodecContext, pCodec, NULL);
解码
现在我们将从流中读取数据包并将它们解码为帧。但首先,需要为
AVPacket 和 AVFrame分配内存。
1
2AVPacket *pPacket = av_packet_alloc();
AVFrame *pFrame = av_frame_alloc();
使用函数 av_read_frame 读取帧数据来填充数据包。
1
2
3while (av_read_frame(pFormatContext, pPacket) >= 0) {
//...
}avcodec_send_packet
来把原始数据包(未解压的帧)发送给解码器。
1 | avcodec_send_packet(pCodecContext, pPacket); |
使用函数 avcodec_receive_frame
从解码器接受原始数据帧(解压后的帧)。 1
avcodec_receive_frame(pCodecContext, pFrame);
可以输出 frame 编号、PTS、DTS、frame 类型等其他信息。
1
2
3
4
5
6
7
8
9
10printf(
"Frame %c (%d) pts %d dts %d key_frame %d [coded_picture_number %d, display_picture_number %d]",
av_get_picture_type_char(pFrame->pict_type),
pCodecContext->frame_number,
pFrame->pts,
pFrame->pkt_dts,
pFrame->key_frame,
pFrame->coded_picture_number,
pFrame->display_picture_number
);
获取 YUV 数据
使用 pFrame->data,它的索引 0,1,2 分别与 Y, Cb 和
Cr 分量相关联,若只读取灰度数据,只需要读取 y
分量的数据即可。下面的代码即表示将 y 分量输出到 SDL 窗口中。
1 | SDL_UpdateTexture(sdlTexture, NULL, pFrameYUV->data[0], pFrameYUV->linesize[0]); |
改动的地方
之前的代码使用 VC++ 作为 IDE,现做了如下修改:
- 编译环境改为 CMake 来管理,支持 Clion IDE。
- FFmpeg 升级到 4.4。
Cmake 配置
代码使用 CMake 管理工程,并引入 FFmpeg 和 SDL 包,如下所示:
1 | # set ffmpeg root directory |
代码说明
文件说明
- test_decoder.c: 验证 FFmpeg 解码功能。
- test_sdl.c: 验证 SDL,直接读取 YUV 文件。
- test_sdl_thread.c:验证 SDL,渲染功能放在另一个线程中。
- test_yuv_sdl.c: 播放器代码,用 FFmpeg 解码 mp4 文件,使用 SDL 渲染视频。
github地址:https://github.com/noahsarkzhang-ts/simple-video-player
参考: